Why should you use a VPN for your Media Box?
For those not aware of what a VPN is or what they are used for, we will give a short introduction.
Virtual Private Networks, VPN’s for short, are networks of computers all over the world that allow their users to reroute their internet traffic through an encrypted tunnel.
VPN Protection
Solid VPN protection effectively achieves two things; number one, your internet traffic is encrypted, and therefore it cannot be snooped on or compromised and number two, your IP address is changed to appear as though you are located in a different place from where you are when using VPN protection.
This being said, it becomes clear why using a VPN protection for your Media Box can be beneficial in multiple ways.
Having VPN protection, the most important thing you will achieve is unlocking all the geolocation restrictions that prevent you access to certain content, and you will also be able to stream from all sources be it legal or less so, without having to worry about your security.
Before we get into the how-to’s it is important to note that a Media Box can be accessed from multiple different devices such as TVs, PCs, smartphones, tablets and others, which means that there are several different guides to read through depending on the type of device you are using and need VPN protection for.
It will be assumed that the Media Box in question has Kodi installed on it, Kodi is the best Media Centre platform out there.
Windows PC
For those who want to begin streaming movies from their Media Box while having the security of a VPN protection on their Windows PC, there are several steps that need to be followed in order to install and configure said VPN.
Installing a VPN
1. First thing that you will have to do is get a VPN that is fast, has many different locations and keeps no logs so you won’t have any issues if you “accidentally” watch a pirated movie. Find one here, we highly recommend IPVanish.
2. The next thing you need to do is download the VPN client software to your PC.
3. After the download is completed double-click on the file and start the installation process. The best VPN solutions have an extremely simple set up process of usually 2 or 3 clicks.
4. If your OS prompts you for administrator’s rights, click “Yes.”
5. Wait a few seconds for the installation to finish and click on “Launch” to run your VPN of choice.
NOTE: Some of the VPN’s that are not the best require much more configuration to run so make sure to select one that is simple to use.
Using The VPN (we will give the example of using IPVanish)
1. After opening the IPVanish client window, wait a few seconds for it to ping all available servers.
2. Select the server you wish to connect to from a dropdown menu located at the top of the window.
3. After that click on the “Connect” button and the software should connect to your desired server and give you a notification about it.
4. To disconnect, click on the same button you used to connect. It will now be marked “Disconnect.”
5. You have successfully connected to your VPN. You can proceed to create a network sharing hotspot, connect your Media Box and stream media content with VPN protection.
Creating a Hotspot
Depending on the version of Windows you have, the process for creating a hotspot that provides VPN protection out of your PC differs a little.
Windows 10
1. Press Windows and I keys at the same time to open up Settings.
2. Click on “Network & Internet.”
3. In the left-hand side menu, click on “Mobile Hotspot.”
4. On the right-hand side, switch the “Share my Internet Connection with other devices” on.
Windows 8
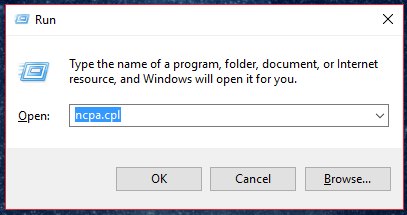
1. Press Windows and R keys to open the “Run” dialog box, type in “ncpa.cpl” into it and then hit Enter.
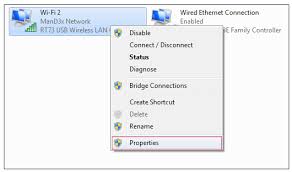
2. In the next window, right-click on your Wireless network and select “Properties.”
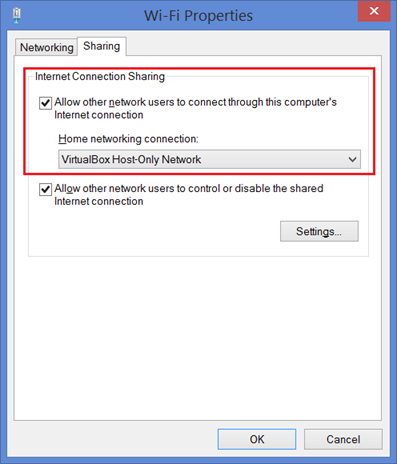
3. Select “Sharing” and check the “Allow other network users to connect through this computer’s Internet connection” checkbox.
4. Press Windows and X and select “Command Prompt (Admin)” from the menu.

5. Type in “netshwlan set hostednetwork mode=allow ssid=”<SSID>” key=”<PASSWORD>”” into the command prompt and change the “SSID” and “PASSWORD” parts of the command into the name of the network and password for the network you wish to use respectively.
6. Type in “netshwlan start hostednetwork” to start broadcasting your network.

Windows 7
1. Open the Manage Wireless Networks window by opening “Start” and searching for “wireless.”
2. Click the Add button.
3. Then, click “Create an ad hoc network.”
4. Choose the name and password of your network and click “OK.”
5. In the window that shows your newly created network, right-click on your network and select “Properties.”
6. Select “Sharing” and check the “Allow other network users to connect through this computer’s Internet connection” checkbox.
Android Devices
1. Find a good VPN here that is fast, keeps no logs, has an Android app. We recommend IPVanish.
2. Go to the GooglePlay site on your andoid phone and find the app for the VPN you purchased. The IPVanish one is here.
3. Download and install on your smart phone.
4. Enter in your username and password from your VPN purchase.
5. Select a server from your server list.
6. Click “Connect”
Creating a Hotspot on an Android.
1. Tap “Settings” in the Home screen menu.
2. Tap “Wireless & Networks” and then “Tethering & portable hotspot.”
3. Tick the checkbox next to “Portable Wi-Fi hotspot.”
4. Tap the “Portable Wi-Fi hotspot settings” and set the name and the password of your network.
Mac OSX
Setting up a VPN protection on your Mac uses the same process as doing so on a Windows PC, and it should not prove difficult.
Installing your VPN
1. First thing that you will have to do is get a VPN. You can find the best ones here. We have found IPVanish to be the best VPN for Mac.
2. The next thing you need to do is download the VPN client software to your PC.
3. After the download is completed, double-click on the file and start the installation process.
4. If your OS prompts you for administrator’s rights, click “Yes.”
5. Wait a few seconds for the installation to finish and click on “Launch” to run your VPN.
Using Your VPN on Mac (IPVanish example shown)
1. Click on the IPVanish app.
2. Enter in your username and password.
3. After opening the IPVanish client window, wait a few seconds for it to automatically ping all available servers.
4. Select the server you wish to connect to from a dropdown menu located at the top of the window.
5. After that click on the “Connect” button and the software should connect to your desired server and give you a notification about it.
6. To disconnect, click on the same button you used to connect. It will now be marked “Disconnect.”
Creating a Hotspot on a Mac.
1. Click the Apple menu and select “System Preferences.”
2. Click the “Sharing” icon.
3. Select the “Internet Sharing.”
4. Select “Ethernet,” since you cannot share a Wi-Fi connection while being connected to a Wi-Fi network.
5. In the “To computers using” box, enable the “Wi-Fi” option.
6. Click the “Wi-Fi Options” button at the bottom of the window to configure your Wi-Fi hotspot. Give it a name and a password of your choice.
7. Click the checkbox to the left of Internet Sharing and click “Start” to activate your Wi-Fi hotspot.
iOS Devices
1. Find a good VPN here that is fast, keeps no logs, has an iOS app. We recommend IPVanish.
2. Go to the iTunes site on your iDevice and find the app for the VPN you purchased. The IPVanish one is here.
3. Download and install on your smart phone.
4. Enter in your username and password from your VPN purchase.
5. Select a server from your server list.
6. Click “Connect.”
Creating a Hotspot on your iOS Device.
1. Tap “Settings.”
2. Tap “Mobile.”
3. Tap “Personal Hotspot” and set “Personal Hotspot” to “On.”
4. Tap “Wi-Fi Password” and set a password of your choice.
Connecting your Media Box to the Network Sharing Hotspot
There are many different makes and types of media boxes on the market and for every one of them, the process of connecting to the wireless network that offers VPN protection is a little bit different.
That being said, pretty much all of them have it in common that during the initial setup process you will be prompted to connect to a Wi-Fi network.
In this case, just choose the hotspot network you just created and type in the password you set and your Media Box will connect to the hotspot running a VPN protection.
Conclusion
In the era of internet surveillance and reduced privacy, having a solid VPN protection can definitely prove beneficial for those looking to stay anonymous on the web.
And even those who are not looking to hide themselves from the prying eyes will still find benefits from VPN protection, since most notably, using VPN protection allows access to geolocation blocked content on media streaming services.