
VPNs are becoming a widely used tool to protect personal data, encrypt internet connections, and provide security and privacy for their growing number of users.
They can also be used to mask the IP address and location of a user, making it appear as though they’re located in one place when they’re really in another.
This feature of VPNs is especially useful when trying to access geo-restricted content. Streaming services like Netflix make certain content only available in specific regions, leaving those who live outside of these areas unable to access the content. A VPN can make it appear as though your device is located in one of the countries in which the content is not blocked and you’ll be able to watch it without any issues.
Unfortunately, not every device supports VPNs. Many people use smart TVs, media streaming dongles or game consoles to stream content, but these devices do not have the ability to use a VPN.
This would keep them from being useful for streaming geo-restricted content, but there are ways to share your VPN connection with these devices so you can stream whatever you want.
Follow this guide to learn the different ways to share your VPN connection with all of your devices.
How to Share a VPN Connection
Method 1: Via a VPN Router
The easiest way to share a VPN connection is to use a VPN router. The majority of routers available today offer built-in VPN clients, which enables them to be configured for virtually any VPN service.
If your router is older or doesn’t have a built-in VPN client, you can still install a VPN on it. To do this you’ll need to flash the router with new firmware that supports the installation of a VPN. The safest router firmware programs that allow this are Tomato and DD-WRT. We have a comprehensive guide on how to install a VPN on your router that includes instructions on how to flash it with new firmware.
Remember that it’s possible to brick your router when flashing it with new firmware, so be sure to follow the exact steps in our guide. If you don’t feel comfortable doing this, you’ll need to buy a router that already has VPN capabilities. We’ve developed a list of the best VPN routers currently available so you can be sure you’re buying the right router for your needs.
Another thing to remember is that just because you’re able to install a VPN on your router does not mean that it will be able to run it properly. Many low-end routers either come with VPN clients installed or can be flashed to allow for VPN installation, but they lack the ability to maintain internet speeds when using the VPN.
This is an issue for regular internet usage, but trying to use these routers for seamless streaming will be nearly impossible. It’s important to purchase a high-quality router, which will likely be more expensive, but it will provide you with the best streaming experience.
Method 2: Share Your VPN Connection via Your Mac or Windows Computer
If you’d prefer to not make changes to your router or purchase a new one, you can try sharing the VPN connection you have on your Mac or Windows computer with your device. We’ve provided instructions for how to do this further down.
This method can save you from potentially damaging your current router or having to spend money on a new one. With that being said, if your router is out of date, it may be a good time to upgrade anyway. A new router can provide faster internet speeds, better security features and will likely have a built-in VPN client.
Method 3: Modify Your DNS Settings
This method actually doesn’t require a VPN service. You’ll just need to change the DNS settings of your device and you’ll be able to make your IP address appear as though it’s from another country. A complete guide on how to do this can be found here.
It’s important to mention that many VPN providers have started to offer free Smart DNS products with their services. If your VPN provider has a Smart DNS service included, then you’ll be able to use it for your devices that don’t support VPNs. If you’re unfamiliar with Smart DNS, we published a guide earlier this year that features all the important information about them.
How to Share a VPN Connection via Your Windows or Mac Computer
In Method 2, we mentioned that we would provide instructions for sharing your VPN on your Mac or Windows computer with your streaming device. We have four different methods that you can use, depending on which operating system you use and if you want to connect to your device with an Ethernet cable or over Wi-Fi.
To use these methods, you’ll need to make sure that your computer either has two or more Ethernet ports or is connected to the internet via Wi-Fi.
If you have at least two Ethernet ports, then you’ll be able to connect your computer to your router with an Ethernet cable and also connect your computer to your device with an Ethernet cable to share your VPN connection.
Sharing a VPN Connection from a Windows 10 Computer Using an Ethernet Cable
To use this method, you’ll need at least one Ethernet port on your computer. If you don’t have one, you should be able to find an Ethernet adapter that will fit one of the ports on your computer.
To get started, complete the following steps.
1. Sign up for a VPN service. Once you’ve signed up, you’ll need to install the VPN app on your computer and then use it to connect to a VPN server. You should then connect your device to your computer with an Ethernet cable.
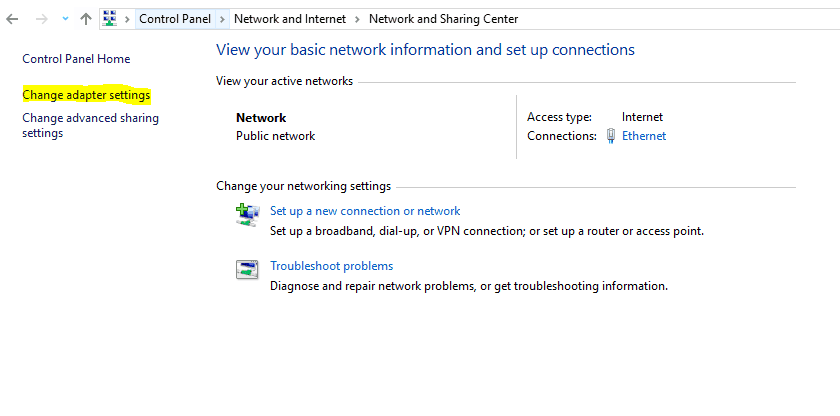
2.Open the Start menu and click on Network & Internet. Then click Status and choose Change your network settings. Once this section opens, click on Change Adapter Settings.
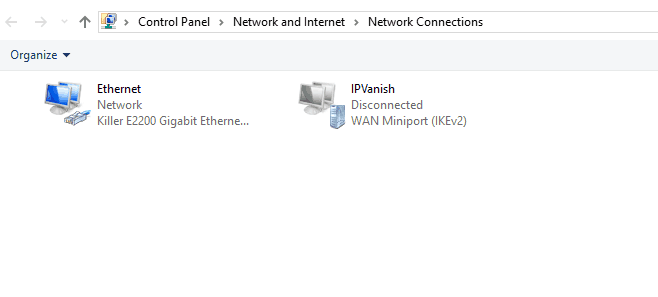
3. Search for your VPN connection. If you have an OpenVPN connection, then your VPN connection may have the name of your VPN provider. In other cases, it will have a label similar to TAP-Windows-Adapter. When you find it, right-click on it and go to the Properties tab.
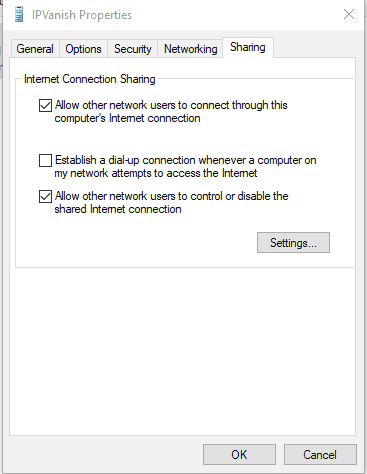
4. Open the Sharing Check the Allow other network users to connect through this machine’s internet connection option. Open the dropdown menu from Select your private internet connection and then choose your Ethernet connection.
5. Click OK.
Your non-VPN capable device should now be sharing the VPN connection from your Windows 10 machine through the Ethernet cable.
Sharing a VPN Connection from a Windows 10 Computer Using Wi-Fi
If you have an updated version of Windows 10, it should natively support the ability to easily create a new Wi-Fi hotspot. These hotspots are compatible with Wi-Fi-enabled devices as well as many Wi-Fi adapters.
Whether your device has a built-in Wi-Fi card or you’re using a Wi-Fi adapter, you’ll be able to use this method by following these steps:
1. Open the Command Prompt, type “netsh wlan show drivers” and hit A code will appear and you should search for the line that says “Hosted network supported.”
a. If this line says “Yes” you should continue with this guide.
b. If this line says “No” you’ll need to take additional steps before continuing. You’ll need to either update all your Wi-Fi drivers or purchase a new Wi-Fi dongle. Another option is to use the method above that requires the use of an Ethernet cable.
2. Open the Start menu and click on Network & Internet. Click on Status and then click Change your networking settings. Click on Mobile Hotspot and change the option to On. You’ll need to take note of the network name and password that appear.
3. Open your VPN app and connect to a server.
4. Open the Start menu again. Click on Settings and then on Network & Internet. Then, click on Status and then Change your network settings. Click Change adapter options.
5. You should be able to see the hotspot you opened. It should have a label similar to Local Area Connection XX. It will sometimes have the label Microsoft Wi-Fi Direct Virtual Adapter. Either one will work. Search for your VPN connection. If you’re using an OpenVPN connection, then it will likely have the name of your VPN provider. Otherwise, it may be labeled as TAP-Windows-Adapter. Right-click on it and go to the Properties Then open the Sharing tab.
6. Check the box next to Allow other network users to connect via this machine’s internet connection. Choose the name of your hotspot from the dropdown menu labeled Select your private internet connection. Be sure to keep the Allow other network users to control and/or disable shared internet connection option enabled.
7. Click OK.
8. Connect your device to your Windows hotspot using the network name and password that you took note of in Step 2.
Your device should now be connected through your hotspot and will be using your VPN connection to reach the internet.
Sharing a VPN Connection from a Mac Computer Using an Ethernet Cable
To use this method, your Mac will need to be connected to the internet via Wi-Fi. There’s no Mac on the market that has more than one Ethernet port, so you’ll need to be connected to Wi-Fi unless you have an Ethernet adapter in addition to a built-in Ethernet port.
If your Mac doesn’t have an Ethernet port at all, you’ll need an Ethernet adapter to use this method. There are plenty of Thunderbolt and USB-C Ethernet adapters available for purchase, so you should be able to find one fairly easily.
If you have an Ethernet adapter that has two Ethernet ports, you should use that instead of using Wi-Fi to connect your Mac to the internet. Ethernet is faster and will provide you a better experience, especially considering that VPNs can reduce your internet speeds.
Another thing to consider about this method is that it makes use of the built-in VPN client in the Mac operating system. This client works best with IKEv2, L2TP and PPTP VPN protocols. It’s very difficult to share a VPN connection with a Mac using the OpenVPN protocol, so we will not cover that method in this guide.
Follow these steps to start sharing your Mac’s VPN connection by connecting to your device with an Ethernet cable:
1. Sign up with a VPN provider. Once you’ve signed up, look for the information on the VPN’s website regarding the installation of the VPN on your Mac. It should give you instructions about how to configure the built-in VPN client.
2. Once you’ve done this, connect to a VPN server.
3. Plug one end of an Ethernet cable into your Mac and the other end into your streaming device.
4. Open System Preferences and click on Sharing. Share your connection to the VPN server with the device you’ve connected to your Ethernet port. Then turn Internet Sharing on by clicking its checkbox.
Your device should now be sharing your Mac’s VPN connection through the Ethernet cable.
Sharing a VPN Connection from a Mac Computer Using Wi-Fi
To use this method, you need to make sure that your Mac is connected to the internet via either a Wi-Fi adapter or an Ethernet cable. Macs do not have the hotspot capabilities that Windows 10 computers have, so you’ll need a Wi-Fi adapter even if your computer has Wi-Fi built in.
This method uses the built-in Mac VPN client, which works best with the IKEv2, L2TP and PPTP VPN protocols. OpenVPN will not work with this method.
To get started, complete the following steps:
1. Sign up with a VPN provider and then follow the website’s instructions for setting up the VPN client on your Mac. Once you’ve followed these steps, connect to a VPN server.
2. Open System Preferences and click Sharing. Click on Internet Sharing and then choose to share your connection from your VPN. Then choose to share your connection To computers using Wi-Fi. Then click Wi-Fi Options.
3. Enter a password for your Wi-Fi hotspot that you’re about to create. Then click OK.
4. Click the checkbox next to Internet Sharing to activate your hotspot.
Your device will now be connected to the internet through your Mac’s VPN connection via Wi-Fi. Remember that you’ll need to leave the Ethernet cable or Wi-Fi adapter plugged into your Mac to maintain the connection.
——————————–
These are all of the methods through which you can share a VPN connection. While many devices allow the use of VPNs, there are just as many that don’t, which is where this guide will come in handy.
As the use of VPNs continues to grow, we may see more and more devices providing native support for VPNs, but until then we hope that you’ll continue to find this guide useful when you set up your devices.